Android Use Cases: From Basic Implementation to Multi-Provider and Multi-Module Systems.
SOLIDify Your Android Architecture…

1. Introduction
Modern Kotlin (and Android) projects often embrace Clean Architecture to keep code well-structured and test-friendly. At its core, Clean Architecture emphasizes:
- Separating business logic from UI code, so each can change independently.
- Relying on interfaces or abstract classes to keep your system flexible and open to new implementations.
- Applying SOLID principles, including the Single Responsibility Principle (SRP), the Dependency Inversion Principle (DIP), and the Liskov Substitution Principle (LSP), to ensure your code remains maintainable as requirements grow.
Where Use Cases fit in Clean Architecture?
The Use Case is a key building block in this philosophy, representing one distinct operation that has a Single Responsibility to perform in your application.
Just like other components in Clean Architecture, Use Cases follow the pattern where their interfaces are defined in the domain layer while their implementations reside in the data layer, serving multiple SOLID principles at once.
Clean Architecture organizes these components into layers:
- The domain layer contains pure business logic, including Use Case interfaces and other abstractions. This is where we define what our Use Cases can do, without concerning ourselves with how they do it.
- The data layer provides concrete implementations, including Use Case implementations. This separation ensures we can modify how a Use Case works without touching its interface.
- The UI layer (or Presentation Layer) consumes the domain layer through dependency injection.
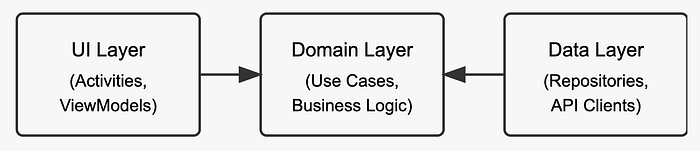
As you can see, the Dependencies flow from the UI Layer to the Domain layer that contains business logic abstractions, and then the Data Layer dependencies are inverted to the Domain Layer in order to hide implementation details.
That is exactly what the Dependency Inversion Principle (DIP) stands for which I extensively describe in this article, targeting Kotlin and the Android architecture, where I explain that Clean Architecture is DIP at scale.
A common Dependency Inversion Misconception
Many developers believe that the Dependency Inversion Principle (DIP) doesn’t truly invert dependency arrows as shown in architectural diagrams.
They mistakenly think that dependencies should still point from the Domain Layer to the Data Layer, reasoning that we’re still using the Data Layer’s functionality through abstract calls instead of concrete calls.
When using concretions, the arrows would indeed point from domain to data layer (domain → data), as the domain would depend directly on data layer implementations.
However, DIP truly inverts this by having the domain layer define the interfaces that the data layer must implement. Now the arrows point inward (domain ← data), as the data layer depends on the domain’s abstractions. This is why we call it dependency “inversion” — we’ve literally inverted the direction of dependency!
Article Walkthrough
In this article,
- we’ll begin by creating a simple, single Use Case, inject it with Koin, and demonstrate it in a ViewModel.
- Then, once we have multiple Use Cases for a domain feature, we’ll look at how to group them in a Manager class to avoid cluttering our ViewModels.
- We’ll walk through an example of how to handle multiple implementations (section 7) of a single interface — think different payment providers — to showcase how LSP lets you swap or expand implementations without rewriting large chunks of your code.
- Also (section 8), we will progress to Multi-Module implementation approach to our payment example.
- Finally, in section 10, we’ll explore how to maintain a balanced Clean Architecture without over-engineering.
2. What Is a Use Case?
A Use Case (also known as an Interactor) encapsulates one piece of business logic or one action your app performs. This is typically logic that:
- Shouldn’t be in your UI code, because mixing UI and business logic leads to difficulties in testing and maintenance.
- Doesn’t belong in your data-access layer (repositories, APIs), because that layer should focus on raw data operations rather than application-specific rules.
By giving each operation its own Use Case, you achieve clarity, modularity, and testability. For instance, a FetchMemesUseCase does exactly one thing: fetch memes from some data source.
Why Use Cases Matter
Imagine you’re building a new feature. Without Use Cases, you might code your logic straight into a ViewModel or an Activity. That may be fine for a tiny project, but as the application grows, you’ll end up with massive classes doing too much.
Use Cases remove that complexity from the UI layer. They also make your domain logic more flexible. If you need to change how memes are fetched — maybe from a REST API to a local database — your UI code remains untouched, because the Use Case interface doesn’t change.
Use Cases and DIP
When you write a Use Case, you typically inject use-case abstractions (e.g., an interface for a repository), not concrete classes. This is Dependency Inversion in action: your Use Case depends on a repository interface rather than a specific implementation. That way, your business logic remains stable even if you swap a REST-based repository for a local database.
Summary: Key Points on Use Cases
- Single Responsibility: Each Use Case has one job.
- Simplicity: Avoids bloating UI or data layers with app-specific rules.
- Testability: Easy to unit-test because it’s UI-agnostic.
- DIP: Depends on interfaces, not concrete classes, for extensibility.
3. Implementing a Simple Use Case
Let’s begin our scenario with a simple example: fetching memes. Although our final scenario will cover a more advanced example (payments), the process for building a simple Use Case remains the same.
Creating the Interface
interface FetchMemesUseCase {
    suspend operator fun invoke(): List<Meme>
}
This says: “A class that implements FetchMemesUseCase must provide a suspend function called invoke that returns a list of Meme.”
Using the
operator fun invoke()syntax allows calling this Use Case just like a function (e.g.,fetchMemesUseCase()).
Implementing the Use Case
class FetchMemesUseCaseImpl(
    private val memeRepository: MemeRepository
) : FetchMemesUseCase {

    override suspend operator fun invoke(): List<Meme> {
        return memeRepository.fetchMemes()
    }
}- We inject a
MemeRepositoryto handle the data operations. FetchMemesUseCaseImplhas no references to Activities, Fragments, or even ViewModels. This keeps it UI-agnostic, perfect for testing.
Repository and Model
interface MemeRepository {
    suspend fun fetchMemes(): List<Meme>
}

class MemeRepositoryImpl(
    private val memeApi: MemeApi
) : MemeRepository {

    override suspend fun fetchMemes(): List<Meme> {
        return memeApi.getMemes() // Hypothetical network call
    }
}

data class Meme(
    val id: Int,
    val title: String,
    val imageUrl: String
)
Here, MemeRepositoryImpl focuses on fetching data from the memeApi. The rest of the app doesn’t care how fetchMemes() is fulfilled, as long as it returns a list of Meme.
Summary: Simple Use Case Implementation
- Interface-first approach: Start with an interface (e.g.,
FetchMemesUseCase) - Implementation: Keep business logic separate from UI frameworks.
- Repository: Hides data-fetch details (API calls, DB queries).
4. Injecting Use Cases with Koin
Koin is a popular dependency injection library in Kotlin. It helps us declare how to build our classes without manually writing a bunch of boilerplate “wiring” code. This perfectly aligns with DIP, since we’ll configure Koin to inject interfaces rather than concrete implementations.
Domain Module
val domainModule = module {
    single<MemeRepository> { MemeRepositoryImpl(get()) }
    factory<FetchMemesUseCase> { FetchMemesUseCaseImpl(get()) }
}
Note: We declare a single instance (single) for MemeRepository but use factory for FetchMemesUseCase—depending on usage patterns, you might prefer one or the other.
- Why
singleforMemeRepository?
Typically, a repository manages data sources (network, database) or caching. Having only one repository instance (single) prevents repeatedly creating resource-heavy connections or caches. - Why
factoryforFetchMemesUseCase?
Use Cases often perform quick actions and don’t hold much state. Defining them withfactorymeans you get a new Use Case instance each time it’s injected, which is fine if it’s lightweight and stateless. In some apps, this helps ensure each usage starts fresh, avoiding any stale data or side effects if a Use Case had internal state.
When to use single and when factory?
In production code, repositories can be expensive or thread-sensitive, so you usually keep a single shared instance; whereas Use Cases might be ephemeral and can safely be a fresh instance each time.
5. Using the Use Case in a ViewModel
Now let’s see how we can invoke our Use Case from an Android ViewModel, keeping the ViewModel’s responsibility squarely in managing UI state.
class MemeListViewModel(
    private val fetchMemesUseCase: FetchMemesUseCase
) : ViewModel() {

    private val _memes = MutableStateFlow<List<Meme>>(emptyList())
    val memes: StateFlow<List<Meme>> = _memes

    fun loadMemes() {
        viewModelScope.launch {
            try {
                // Thanks to operator fun invoke(), we call it like a function
                val memeList = fetchMemesUseCase()
                _memes.value = memeList
            } catch (e: Exception) {
                // Handle error gracefully
            }
        }
    }
}
Dependency Inversion remains intact; this ViewModel only depends on FetchMemesUseCase, an interface.
6. Combining Similar Use Cases into a Manager
As your app grows, you might have multiple Use Cases focused on the same domain — like fetching, deleting, or sharing memes. Injecting them all directly into a single ViewModel might feel unwieldy.
Introducing a Manager
A Manager (sometimes called a facade) groups multiple Use Cases for a related domain. To further enforce DIP, we can define a Manager interface and a Manager implementation:
// 1) Define the interface
interface MemeManager {
    // Direct delegations to Use Cases
    suspend fun fetchMemes(): List<Meme>
    suspend fun deleteMemes(ids: Set<Int>)
    suspend fun toggleFavorite(memeId: Int)
}

// 2) Provide a concrete implementation
class MemeManagerImpl(
    private val fetchMemesUseCase: FetchMemesUseCase,
    private val deleteMemesUseCase: DeleteMemesUseCase,
    private val toggleFavoriteUseCase: ToggleFavoriteUseCase
) : MemeManager {

    override suspend fun fetchMemes(): List<Meme> {
        // Manager calls the underlying Use Case
        return fetchMemesUseCase()
    }

    override suspend fun deleteMemes(ids: Set<Int>) {
        deleteMemesUseCase(ids)
    }

    override suspend fun toggleFavorite(memeId: Int) {
        toggleFavoriteUseCase(memeId)
    }
}
By doing so, your ViewModel or DI system can rely on MemeManager (the interface), not the concrete MemeManagerImpl. This adheres to DIP at the "manager" layer as well.
The Manager maintains Single Responsibility by focusing solely on delegating to domain-specific Use Cases. The Manager doesn't contain business logic (that belongs in Use Cases) or UI logic (that belongs in ViewModels) — it simply delegates operations to the appropriate Use Case.
Through the interface, we expose all Use Case operations in a unified interface, allowing the ViewModel to work with a single dependency while remaining unaware of the concrete implementations.
Using the Manager in the ViewModel
class MemeListViewModel(
    private val memeManager: MemeManager // We depend on the interface
) : ViewModel() {

    fun loadMemes() {
        viewModelScope.launch {
            val memes = memeManager.fetchMemes()
            // ...
        }
    }
}
You can now inject MemeManager just like any other interface:
val managerModule = module {
    factory<MemeManager> { MemeManagerImpl(get(), get(), get()) }
}
Combine this module with your other modules in Koin to complete the setup.
Single Responsibility Stays Intact
Each Use Case still has one job (fetch, delete, toggle). The Manager just wraps them together, simplifying the ViewModel’s constructor.
Because you have a Manager interface, the higher-level code doesn’t depend on a concrete manager implementation — further ensuring DIP.
Manager class Drawbacks
However, be mindful that overusing Managers can sometimes hide complexity rather than reduce it. If a Manager tries to handle too many Use Cases, you might just shift bloat from your ViewModels into the Manager layer.
Summary on the Manager Pattern
We introduced the Manager pattern to bundle multiple Use Cases under one interface. This approach simplifies our ViewModels but also preserves clarity around each single-responsibility Use Case.
Manager Pattern Pros:
- Fewer constructor params in ViewModels
- Single interface per domain
- Clear separation of concerns
- Simple Delegation Pattern
Tip: Keep a close eye on each Manager’s scope to ensure SRP isn’t violated
And don’t foget, according to Clean Architecture principles, the Manager should NOT contain business logic.
Its job is to only
- Group related Use Cases
- Provide a simpler interface to the ViewModel
- Handle orchestration between Use Cases if needed
7. Multiple Implementations Example: Liskov Substitution Principle by example
Even with a Manager approach, you may need to support multiple implementations of the same set of actions (charging, verifying, refunding). That’s where the Liskov Substitution Principle (LSP) truly shines: each provider (Stripe, PayPal, etc.) implements the same interfaces in their own way, and your higher-level code remains unchanged.
Payments Example: Multiple Use Case Providers + Manager class
Let’s look at a real-world scenario — a payment system that needs to support multiple payment providers (like PayPal, Stripe, Klarna, etc).
To manage these different implementations efficiently, we’ll introduce a container pattern that groups related Use Cases for each provider. This approach allows us to handle providers that might not support all operations while maintaining a clean interface.
The big thing here is we can pack several different implementations of the same Use Cases under different providers to the same Manager and still preserve all the SOLID Principles.
Let’s see how this all comes together in the following diagram, which shows the complete architecture from ViewModel to concrete implementations which allows to scale or swap providers without rewriting large chunks of code:
You can scale or swap providers without rewriting large chunks of code.
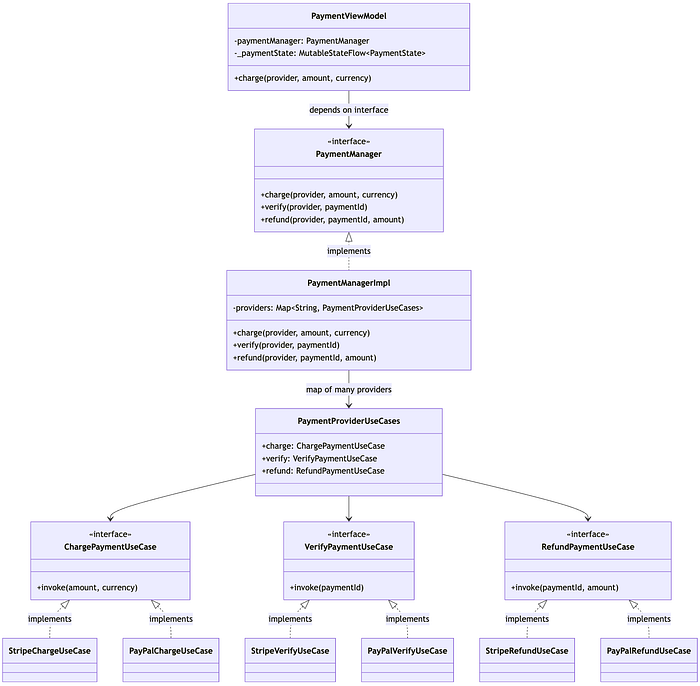
The above diagram illustrates the complete architecture of our payment system:
PaymentViewModelonly depends on thePaymentManagerinterfacePaymentManagerImpluses a Map to select the appropriate payment provider- Each provider (Stripe, PayPal, Square) implements the same set of use cases differently for each provider
- The architecture allows easy addition of new payment providers without changing existing code
Note:
StripeChargeUseCaseshould beStripeChargePaymentUseCaseand so on, but to make the graphic fit to the width of this article, deliberately removed the “Payment” keyword from all Use Case implementations.
Let’s examine each component in detail…
7.1 Defining Payment Use Cases
We’ll define three Use Case interfaces — charge, verify, refund — plus a model for the result:
interface ChargePaymentUseCase {
    suspend operator fun invoke(amount: Double, currency: String): PaymentResult
}

interface VerifyPaymentUseCase {
    suspend operator fun invoke(paymentId: String): Boolean
}

interface RefundPaymentUseCase {
    suspend operator fun invoke(paymentId: String, amount: Double): PaymentResult
}

data class PaymentResult(
    val success: Boolean,
    val transactionId: String? = null,
    val errorMessage: String? = null
)SRP: We have three different interfaces, each dedicated to a single action.
This promotes the Single Responsibility Principle (SRP) by splitting each action into its own Use Case. It also aligns with the Interface Segregation Principle (ISP): you define only the functions from the interfaces that each action requires. For example, if a provider doesn’t need to implement verification, it can simply exclude the VerifyPaymentUseCase.
A Note on ISP
Some providers may not implement all actions (e.g., no verify). Thanks to Interface Segregation, each provider implements only the interfaces it needs. No client is forced to depend on methods it doesn’t use.
7.2 Payment Provider Implementations
Now, each payment provider implements these Use Cases according to its rules. Below are simplified Stripe and PayPal examples.
Stripe Implementation
class StripeChargePaymentUseCase : ChargePaymentUseCase {
    override suspend fun invoke(amount: Double, currency: String): PaymentResult {
        // Hypothetical Stripe API call
        return PaymentResult(
            success = true,
            transactionId = "stripe_tx_12345"
        )
    }
}

class StripeVerifyPaymentUseCase : VerifyPaymentUseCase {
    override suspend fun invoke(paymentId: String): Boolean {
        // Verify with Stripe
        return true
    }
}

class StripeRefundPaymentUseCase : RefundPaymentUseCase {
    override suspend fun invoke(paymentId: String, amount: Double): PaymentResult {
        // Refund via Stripe
        return PaymentResult(success = true, transactionId = "stripe_ref_67890")
    }
}
PayPal Implementation
class PayPalChargePaymentUseCase : ChargePaymentUseCase {
    override suspend fun invoke(amount: Double, currency: String): PaymentResult {
        // Hypothetical PayPal API call
        return PaymentResult(
            success = true,
            transactionId = "paypal_tx_ABC"
        )
    }
}

class PayPalVerifyPaymentUseCase : VerifyPaymentUseCase {
    override suspend fun invoke(paymentId: String): Boolean {
        // Verify with PayPal
        return false // Let's say it fails
    }
}

class PayPalRefundPaymentUseCase : RefundPaymentUseCase {
    override suspend fun invoke(paymentId: String, amount: Double): PaymentResult {
        // Refund via PayPal
        return PaymentResult(success = false, errorMessage = "Refund failed")
    }
}
We can keep going with other providers, e.g., CreditCardChargePaymentUseCase.
7.3 Grouping Provider-Specific Use Cases into a Container
Instead of injecting three separate Use Cases (charge/verify/refund) per provider into a constructor, we can create a container for each provider’s Use Cases:
class PaymentProviderUseCases(
    val charge: ChargePaymentUseCase,
    val verify: VerifyPaymentUseCase?,
    val refund: RefundPaymentUseCase?
)- verify and refund can be nullable (
null) if that provider doesn’t support them. - Example:
val stripeUseCases = PaymentProviderUseCases(
    charge = StripeChargePaymentUseCase(),
    verify = StripeVerifyPaymentUseCase(),
    refund = StripeRefundPaymentUseCase()
)

val paypalUseCases = PaymentProviderUseCases(
    charge = PayPalChargePaymentUseCase(),
    verify = PayPalVerifyPaymentUseCase(),
    refund = PayPalRefundPaymentUseCase()
)
(Some providers might not implement one or more actions; those can be null.)
Summary: Provider Containers
- Less constructor clutter: One container per provider.
- Null-safety: If a provider doesn’t implement an action, set it to
null. - LSP: Each provider “slot” can be swapped with another that implements the same interfaces.
7.4 PaymentManager Using a Map
Now, define one PaymentManager interface that the ViewModel will use. It has methods for charge, verify, and refund:
interface PaymentManager {
    suspend fun charge(providerName: String, amount: Double, currency: String): PaymentResult
    suspend fun verify(providerName: String, paymentId: String): Boolean
    suspend fun refund(providerName: String, paymentId: String, amount: Double): PaymentResult
}PaymentManagerImpl:
We pass in a Map<String, PaymentProviderUseCases>, keyed by provider name—e.g. "stripe", "paypal", "creditcard". This ensures:
- Cleaner Constructor: We have one map, not multiple fields for each use case.
- Scalability: Adding a new provider is as simple as adding an entry to the map.
class PaymentManagerImpl(
    private val providers: Map<String, PaymentProviderUseCases>
) : PaymentManager {

    override suspend fun charge(providerName: String, amount: Double, currency: String): PaymentResult {
        // Retrieve the right provider's container, or handle unknown provider
        val useCases = providers[providerName.lowercase()]
            ?: return PaymentResult(false, errorMessage = "Unknown provider: $providerName")

        // Call the provider-specific ChargePaymentUseCase
        return useCases.charge(amount, currency)
    }

    override suspend fun verify(providerName: String, paymentId: String): Boolean {
        val useCases = providers[providerName.lowercase()] ?: return false

        // If no verify use case, we decide to return false or handle differently
        val verifyUC = useCases.verify ?: return false
        return verifyUC(paymentId)
    }

    override suspend fun refund(providerName: String, paymentId: String, amount: Double): PaymentResult {
        val useCases = providers[providerName.lowercase()]
            ?: return PaymentResult(false, errorMessage = "Unknown provider: $providerName")

        // If no refund use case, return an error
        val refundUC = useCases.refund
            ?: return PaymentResult(false, errorMessage = "Refund not supported for $providerName")
        return refundUC(paymentId, amount)
    }
}
Key Benefit: We avoid big when statements in the ViewModel, and we can add new providers just by populating the map.
This map-based approach keeps code organized, avoids huge parameter lists, and naturally supports LSP (each provider can supply any subset of use cases, as needed).
Advantages:
- Cleaner constructor: You only inject one map, not six or nine separate Use Cases.
- Easier to add providers: Construct a new
PaymentProviderUseCasesfor each provider and put it in the map. - Aligns with DIP:
PaymentManagerImpldepends on interfaces for the Use Cases and a map of providers, not on a big chain ofwhenorifstatements.
7.5 Providing the PaymentManager in Koin
A typical Koin module might look like this:
val paymentModule = module {
    // PaymentProviderUseCases instances for each provider
    single {
        PaymentProviderUseCases(
            charge = StripeChargePaymentUseCase(),
            verify = StripeVerifyPaymentUseCase(),
            refund = StripeRefundPaymentUseCase()
        )
    } bind PaymentProviderUseCases::class named "stripe"

    single {
        PaymentProviderUseCases(
            charge = PayPalChargePaymentUseCase(),
            verify = PayPalVerifyPaymentUseCase(),
            refund = PayPalRefundPaymentUseCase()
        )
    } bind PaymentProviderUseCases::class named "paypal"

    // Create a map of providerName -> PaymentProviderUseCases
    single<Map<String, PaymentProviderUseCases>> {
        mapOf(
            "stripe" to get<PaymentProviderUseCases>(qualifier = named("stripe")),
            "paypal" to get<PaymentProviderUseCases>(qualifier = named("paypal"))
        )
    }

    // Finally, provide our PaymentManager
    single<PaymentManager> { PaymentManagerImpl(get()) }
}- Here, we bind each
PaymentProviderUseCaseswith a qualifier (named"stripe","paypal") to differentiate them in the container. - Then we construct the map for the
PaymentManagerImpl. - Because
PaymentManagerImpldepends on aMap<String, PaymentProviderUseCases>, Koin will use that map.
(The exact syntax may vary slightly depending on your Koin version.)
7.6 Using PaymentManager in a ViewModel
Below is an updated PaymentViewModel with code comments clarifying how it obtains the correct payment type from PaymentManager:
class PaymentViewModel(
    // DIP: We depend on the PaymentManager interface, not a concrete class
    private val paymentManager: PaymentManager
) : ViewModel() {

    // Live data or StateFlow to hold charge results
    private val _chargeResult = MutableStateFlow<PaymentResult?>(null)
    val chargeResult: StateFlow<PaymentResult?> = _chargeResult

    /**
     * Charge a given provider for a certain amount in a given currency.
     * The PaymentManager looks up the correct ProviderUseCases in its map and calls 'charge'.
     */
    fun charge(providerName: String, amount: Double, currency: String) {
        viewModelScope.launch {
            val result = paymentManager.charge(providerName, amount, currency)
            // Update our state flow with the result
            _chargeResult.value = result
        }
    }

    /**
     * Similarly, 'verify' and 'refund' can be invoked, each calling PaymentManager
     * which routes to the right use case for the selected provider.
     */
    // fun verify(...) { ... }
    // fun refund(...) { ... }
}- Calling
charge("stripe", 50.0, "USD")instructs the manager to look up"stripe"in its map, retrieve the container of Stripe use cases, and invokecharge. - If
"stripe"is not found, or if the container is missing a given use case, the manager returns an appropriate error.
Now, each payment action (charge, verify, refund) reduces to a Use Case with its own provider-specific implementation. The manager simply looks up the correct PaymentProviderUseCases in the map and calls the appropriate method.
Thanks to LSP, you can drop in any new provider with its own container of Use Cases. The ViewModel or higher-level code only depends on PaymentManager, reinforcing DIP and ISP.
8. Transitioning from Single Module to Multi-Module Payment Systems
When moving from a single-module structure to a multi-module system, the goal is to keep your core logic separate from provider-specific implementations. You do this by creating a dedicated “payment-core” module for shared interfaces and data classes, and additional modules for each provider’s distinct logic.
Below is an example of how the code transitions from being in one module to being split across multiple modules. We’ll start by placing the common payment contracts into a payment-core module, then create separate modules named payment-stripe and payment-paypal.
1. The “payment-core” Module
This module holds all your key interfaces, basic data models, and the PaymentManager logic. It becomes the foundation that each provider module depends on.
// Define common interfaces and models
interface ChargePaymentUseCase {
    suspend operator fun invoke(amount: Double, currency: String): PaymentResult
}

interface VerifyPaymentUseCase {
    suspend operator fun invoke(paymentId: String): Boolean
}

interface RefundPaymentUseCase {
    suspend operator fun invoke(paymentId: String, amount: Double): PaymentResult
}

data class PaymentResult(
    val success: Boolean,
    val transactionId: String? = null,
    val errorMessage: String? = null
)

// Container for grouping provider-specific use cases
data class PaymentProviderUseCases(
    val charge: ChargePaymentUseCase,
    val verify: VerifyPaymentUseCase?,
    val refund: RefundPaymentUseCase?
)

// PaymentManager manages the correct provider's use cases
interface PaymentManager {
    suspend fun charge(providerName: String, amount: Double, currency: String): PaymentResult
    suspend fun verify(providerName: String, paymentId: String): Boolean
    suspend fun refund(providerName: String, paymentId: String, amount: Double): PaymentResult
}

class PaymentManagerImpl(
    private val providers: Map<String, PaymentProviderUseCases>
) : PaymentManager {

    override suspend fun charge(providerName: String, amount: Double, currency: String): PaymentResult {
        val useCases = providers[providerName.lowercase()]
            ?: return PaymentResult(false, errorMessage = "Unknown provider: $providerName")
        return useCases.charge(amount, currency)
    }

    override suspend fun verify(providerName: String, paymentId: String): Boolean {
        val useCases = providers[providerName.lowercase()] ?: return false
        val verifyUC = useCases.verify ?: return false
        return verifyUC(paymentId)
    }

    override suspend fun refund(providerName: String, paymentId: String, amount: Double): PaymentResult {
        val useCases = providers[providerName.lowercase()]
            ?: return PaymentResult(false, errorMessage = "Unknown provider: $providerName")
        val refundUC = useCases.refund
            ?: return PaymentResult(false, errorMessage = "Refund not supported for $providerName")
        return refundUC(paymentId, amount)
    }
}
In payment-core, you define your interfaces (like ChargePaymentUseCase), the container class (PaymentProviderUseCases), and the PaymentManager (plus its default implementation). You do not include any provider-specific details here.
2. A Provider Module: “payment-stripe”
This module implements the interfaces from payment-core specifically for Stripe. Notice it references the ChargePaymentUseCase, VerifyPaymentUseCase, and RefundPaymentUseCase classes from com.example.paymentcore.
// Stripe-specific implementations
class StripeChargePaymentUseCase : ChargePaymentUseCase {
    override suspend fun invoke(amount: Double, currency: String): PaymentResult {
        // Hypothetical Stripe API call
        return PaymentResult(success = true, transactionId = "stripe_tx_12345")
    }
}

class StripeVerifyPaymentUseCase : VerifyPaymentUseCase {
    override suspend fun invoke(paymentId: String): Boolean = true
}

class StripeRefundPaymentUseCase : RefundPaymentUseCase {
    override suspend fun invoke(paymentId: String, amount: Double): PaymentResult {
        // Hypothetical refund call
        return PaymentResult(success = true, transactionId = "stripe_ref_67890")
    }
}

// Koin module for Stripe
val stripeModule = module {
    single<PaymentProviderUseCases>(named("stripe")) {
        PaymentProviderUseCases(
            charge = StripeChargePaymentUseCase(),
            verify = StripeVerifyPaymentUseCase(),
            refund = StripeRefundPaymentUseCase()
        )
    }
}
Here, the payment-stripe module only cares about Stripe. It implements the interfaces from the core module and provides them through a Koin module definition (stripeModule). This allows other parts of your app to include Stripe functionality by simply including the “payment-stripe” library and its Koin definitions.
3. Another Provider Module: “payment-paypal”
Similarly, payment-paypal contains everything needed for PayPal. It relies on payment-core, but not on payment-stripe, letting you update or remove the Stripe module without touching PayPal code.
// PayPal-specific implementations
class PayPalChargePaymentUseCase : ChargePaymentUseCase {
    override suspend fun invoke(amount: Double, currency: String): PaymentResult {
        // Hypothetical PayPal API call
        return PaymentResult(success = true, transactionId = "paypal_tx_ABC")
    }
}

class PayPalVerifyPaymentUseCase : VerifyPaymentUseCase {
    override suspend fun invoke(paymentId: String): Boolean = false
}

class PayPalRefundPaymentUseCase : RefundPaymentUseCase {
    override suspend fun invoke(paymentId: String, amount: Double): PaymentResult {
        // Hypothetical refund call
        return PaymentResult(success = false, errorMessage = "Refund failed")
    }
}

// Koin module for PayPal
val paypalModule = module {
    single<PaymentProviderUseCases>(named("paypal")) {
        PaymentProviderUseCases(
            charge = PayPalChargePaymentUseCase(),
            verify = PayPalVerifyPaymentUseCase(),
            refund = PayPalRefundPaymentUseCase()
        )
    }
}
4. Aggregating Everything in the Main Application
In your main application (or another dedicated module), you combine the core module and whichever provider modules you need. You build a map of providers, then give it to PaymentManagerImpl.
// Main app Koin module that aggregates provider modules
val paymentAggregatorModule = module {
    // Construct a map from provider names to their PaymentProviderUseCases
    single<Map<String, PaymentProviderUseCases>> {
        mapOf(
            "stripe" to get<PaymentProviderUseCases>(named("stripe")),
            "paypal" to get<PaymentProviderUseCases>(named("paypal"))
        )
    }
    // Provide the PaymentManager from the core module
    single<PaymentManager> { PaymentManagerImpl(get()) }
}
Your PaymentViewModel or any other class that depends on PaymentManager remains unchanged. It doesn’t need to know or care which provider modules are loaded. The manager’s map-based approach does all the routing behind the scenes.
Module Dependencies Overview:
- The payment-core module is your base module that contains all interfaces and contracts. It has no dependencies on other payment modules.
- Provider modules (payment-stripe, payment-paypal) each depend only on payment-core, never on each other. This ensures that provider implementations remain isolated and can be added or removed without affecting other providers.
- Your app module or a dedicated payment-aggregator module depends on both payment-core and whichever provider modules you want to include. This clean dependency structure ensures that adding or removing payment providers is as simple as including or excluding their respective modules, with no changes required to other providers or the core payment logic.
Why This Helps Large Projects
By splitting the payment logic across multiple modules, each team or developer can focus on a single module without affecting the rest of the codebase. You can update the Stripe SDK in the payment-stripe module or add new features to PayPal in payment-paypal without creating conflicts.
Build times also tend to improve because you only rebuild the module that has changed rather than recompiling the entire project. This flexible design means you can add, remove, or update providers at any time with minimal disruption, all while respecting Clean Architecture and the SOLID principles outlined in earlier sections of the article.
9. Why not just use Multi-Providers as a module in a Multi-Module app?
A Natural Evolution At this point, you might wonder: “Why break our payment system further into modules? Couldn’t the entire multi-provider payment system exist as a single module in our multi-module app?”
This is a valid question.
At this point, you might be asking, “Why split each payment provider into its own module? Couldn’t we just create one module — say,
payment-providers—and keep all providers in there?”This is a valid question because our multi-provider system, as described, already follows good separation of concerns.
Each provider implements its own Use Cases, and the
PaymentManagercoordinates them all.In principle, you could wrap this entire setup in one module and still benefit from cleaner architecture.
However, placing every provider in a single module can become cumbersome for larger projects or teams that change providers frequently.
By breaking each provider into its own module (for example, payment-stripe, payment-paypal, and so on), you give each implementation true independence. That means your team can update the Stripe SDK without worrying about conflicts in the PayPal code, and vice versa.
If a provider is no longer needed, removing its module will not disturb the others. Build times also tend to improve because modifying one module only requires rebuilding that module—rather than re-verifying the entire multi-provider bundle.
Managing dependencies is simpler, too, since each module controls its own library versions. This shields you from potential version clashes between providers that might require conflicting libraries.
It also makes your app more flexible: if you only need Stripe for one product flavor or a specific release variant, you can include just that provider’s module and skip the rest.
In short, splitting providers into separate modules is not mandatory, but it often pays off once your project grows or your business introduces multiple payment options at a rapid pace.
10. Real-Life Usage Balance
All the techniques covered so far provide a robust way to separate business logic from UI concerns and decouple data layer details. However, it’s important to balance the benefits of extra layers against the cost of creating and maintaining them.
If you add too many abstractions too soon, you risk over-engineering and confusion. If you avoid them altogether, you might limit testing, reuse, or parallel development.
Finding the sweet spot depends on factors like team size, project scope, and domain complexity.
10.1 When the Manager or Facade Makes Sense
A Manager (or facade) can streamline your code if you have several related Use Cases in the same domain or if you need to orchestrate multiple actions (fetching, transforming, logging).
For a single or trivial operation, a Manager might be overkill. Always confirm it adds value by reducing duplication or complexity.
10.2 When Less Is More
At an app’s early stages, or if you only need a quick data fetch or a small business rule, a dedicated Use Case layer can add more overhead than value.
By starting simple, you avoid building for uncertain futures.
As soon as you notice your ViewModel or repository code becoming long or repetitive, that’s your cue to extract a Use Case or another layer. This incremental approach ensures each abstraction is introduced to solve a real problem rather than a hypothetical one.
10.3 When More Is Needed
If your domain logic expands to include special sorting, filtering, or transformations, placing that code in a Use Case helps keep your ViewModel clean and testable.
Likewise, if you have multiple Use Cases that interact, a Manager (or facade) can simplify your presentation layer by orchestrating complex flows.
Just confirm that the Manager actually reduces clutter—if it merely forwards requests without adding logic, it might be overkill.
- Naming and Clarity: Whether you’re creating a Use Case or Manager, choose descriptive names. Instead of
MemesUseCase, considerSortMemesByDateorFilterMemesByCategory. Plain class names (e.g.,MemeSorter) are also fine if it clearly describes the job. - Parallel Development: For larger or fast-growing teams, isolating code into Use Cases or modules helps each developer work on a separate part (e.g., PayPal vs. Stripe payments) without blocking others. This structure can minimize merge conflicts and provide clear ownership of different features.
10.4 Balancing & Iterating
Clean Architecture works best as an iterative practice, rather than an all-or-nothing design. You might start with ViewModel → Repository, then add Use Cases or modules as needed to handle growth:
- Prototype: Keep it simple if you have minimal logic.
- Identify Pain Points: Extract a Use Case when code becomes cumbersome to maintain or test.
- Introduce Managers: Combine related Use Cases if that genuinely simplifies the ViewModel layer.
- Consider Modules: If your team or codebase grows, splitting domains into separate modules can reduce build times and isolate changes.
This approach lets you refactor with minimal disruption, adding or removing abstractions as the project evolves. Clean Architecture shouldn’t be a static blueprint — adjust layers to match your app’s current and actual requirements.
10.5 Conclusion on Balance
Ultimately, Clean Architecture provides helpful guardrails for separating concerns, easing testing, and supporting changes over time. However, it doesn’t mean creating a new class or module for every little detail.
By evolving your design step by step — introducing layers or modules only when they solve real problems — you can avoid “abstraction hell” and keep your codebase both flexible and easy to understand.
11. Conclusion
Throughout this article, we walked through practical examples of Clean Architecture and Use Cases,
- starting with a simple case of fetching memes and expanding into multi-provider payment scenarios.
- We showed how you can structure your code so that business logic is kept separate from UI frameworks, making it easier to test, maintain, and extend.
- Along the way, we covered how Managers (or facades) can simplify the interaction with multiple Use Cases,
- and how splitting code into modules can isolate providers or features. Finally, we emphasized the importance of finding a balance.
While it’s good to keep code organized and testable, adding layers or modules too soon can cause unnecessary complexity.
Evolving your architecture incrementally — only where it solves real problems — helps maintain a system that’s both flexible and approachable for your team.
12. Key Takeaways
- Use Cases keep your business logic separate from UI concerns, boosting testability and clarity.
- Manager classes (or facades) can simplify how your UI interacts with multiple Use Cases. By defining a Manager interface, you ensure your higher-level code depends on abstractions (DIP) rather than a specific implementation. Use them when you actually need orchestration or have many domain actions, not just as a default.
- LSP ensures that if you design an interface (or set of Use Cases) carefully, any provider can be substituted in, whether you’re dealing with Stripe, PayPal, or any interchangeable set of services.
- ISP is maintained because no provider is forced to implement methods it doesn’t need; each provider can pick and choose the relevant actions (charge, verify, refund).
- DIP is upheld at every layer (Use Cases, Repositories, Managers, and ViewModels), making the system easy to test, mock, and extend.
- Modular Approach: Multi-module setups are powerful for large teams or complex domains, but be mindful of overhead. Splitting too soon can slow down smaller projects.
- Balance & Incremental Refinement: Use Cases, Managers, and modules should be added when needed, not just in case. Let your architecture grow with your project to stay clear and maintainable.
13. Next Steps
- Incremental Abstraction: Review your codebase for areas where repeated logic or complex features might benefit from a Use Case or Manager. Add layers gradually, ensuring each addition provides real value.
- Refactoring & Testing: Revisit existing features to see if a Use Case or façade would improve testability and readability. Keep tests synced with any new layer you introduce.
- Evaluate Module Splits: Consider whether parts of your domain (e.g., “payment,” “orders,” “profile”) are big enough or independent enough to become separate modules. If multiple developers are stepping on each other’s code, a modular approach can help.
- Error Handling: Explore sealed classes or a
Resulttype for more robust error management, especially in payment flows or other critical paths. - Further Principles: Look into Interface Segregation more deeply if you have providers with incomplete feature sets. Also explore patterns like Strategy or Mediator if your Manager classes start to grow.
- Team & Project Growth: Reassess your architecture as your team expands or your domain logic evolves. Sometimes you’ll need stricter boundaries and more modules; other times, a simple approach remains ideal.
By iterating on these steps, you can keep the code organized and test-friendly without falling into the trap of premature abstraction.